Web3 Wallet Authentication System: A Decentralized Approach
Overview
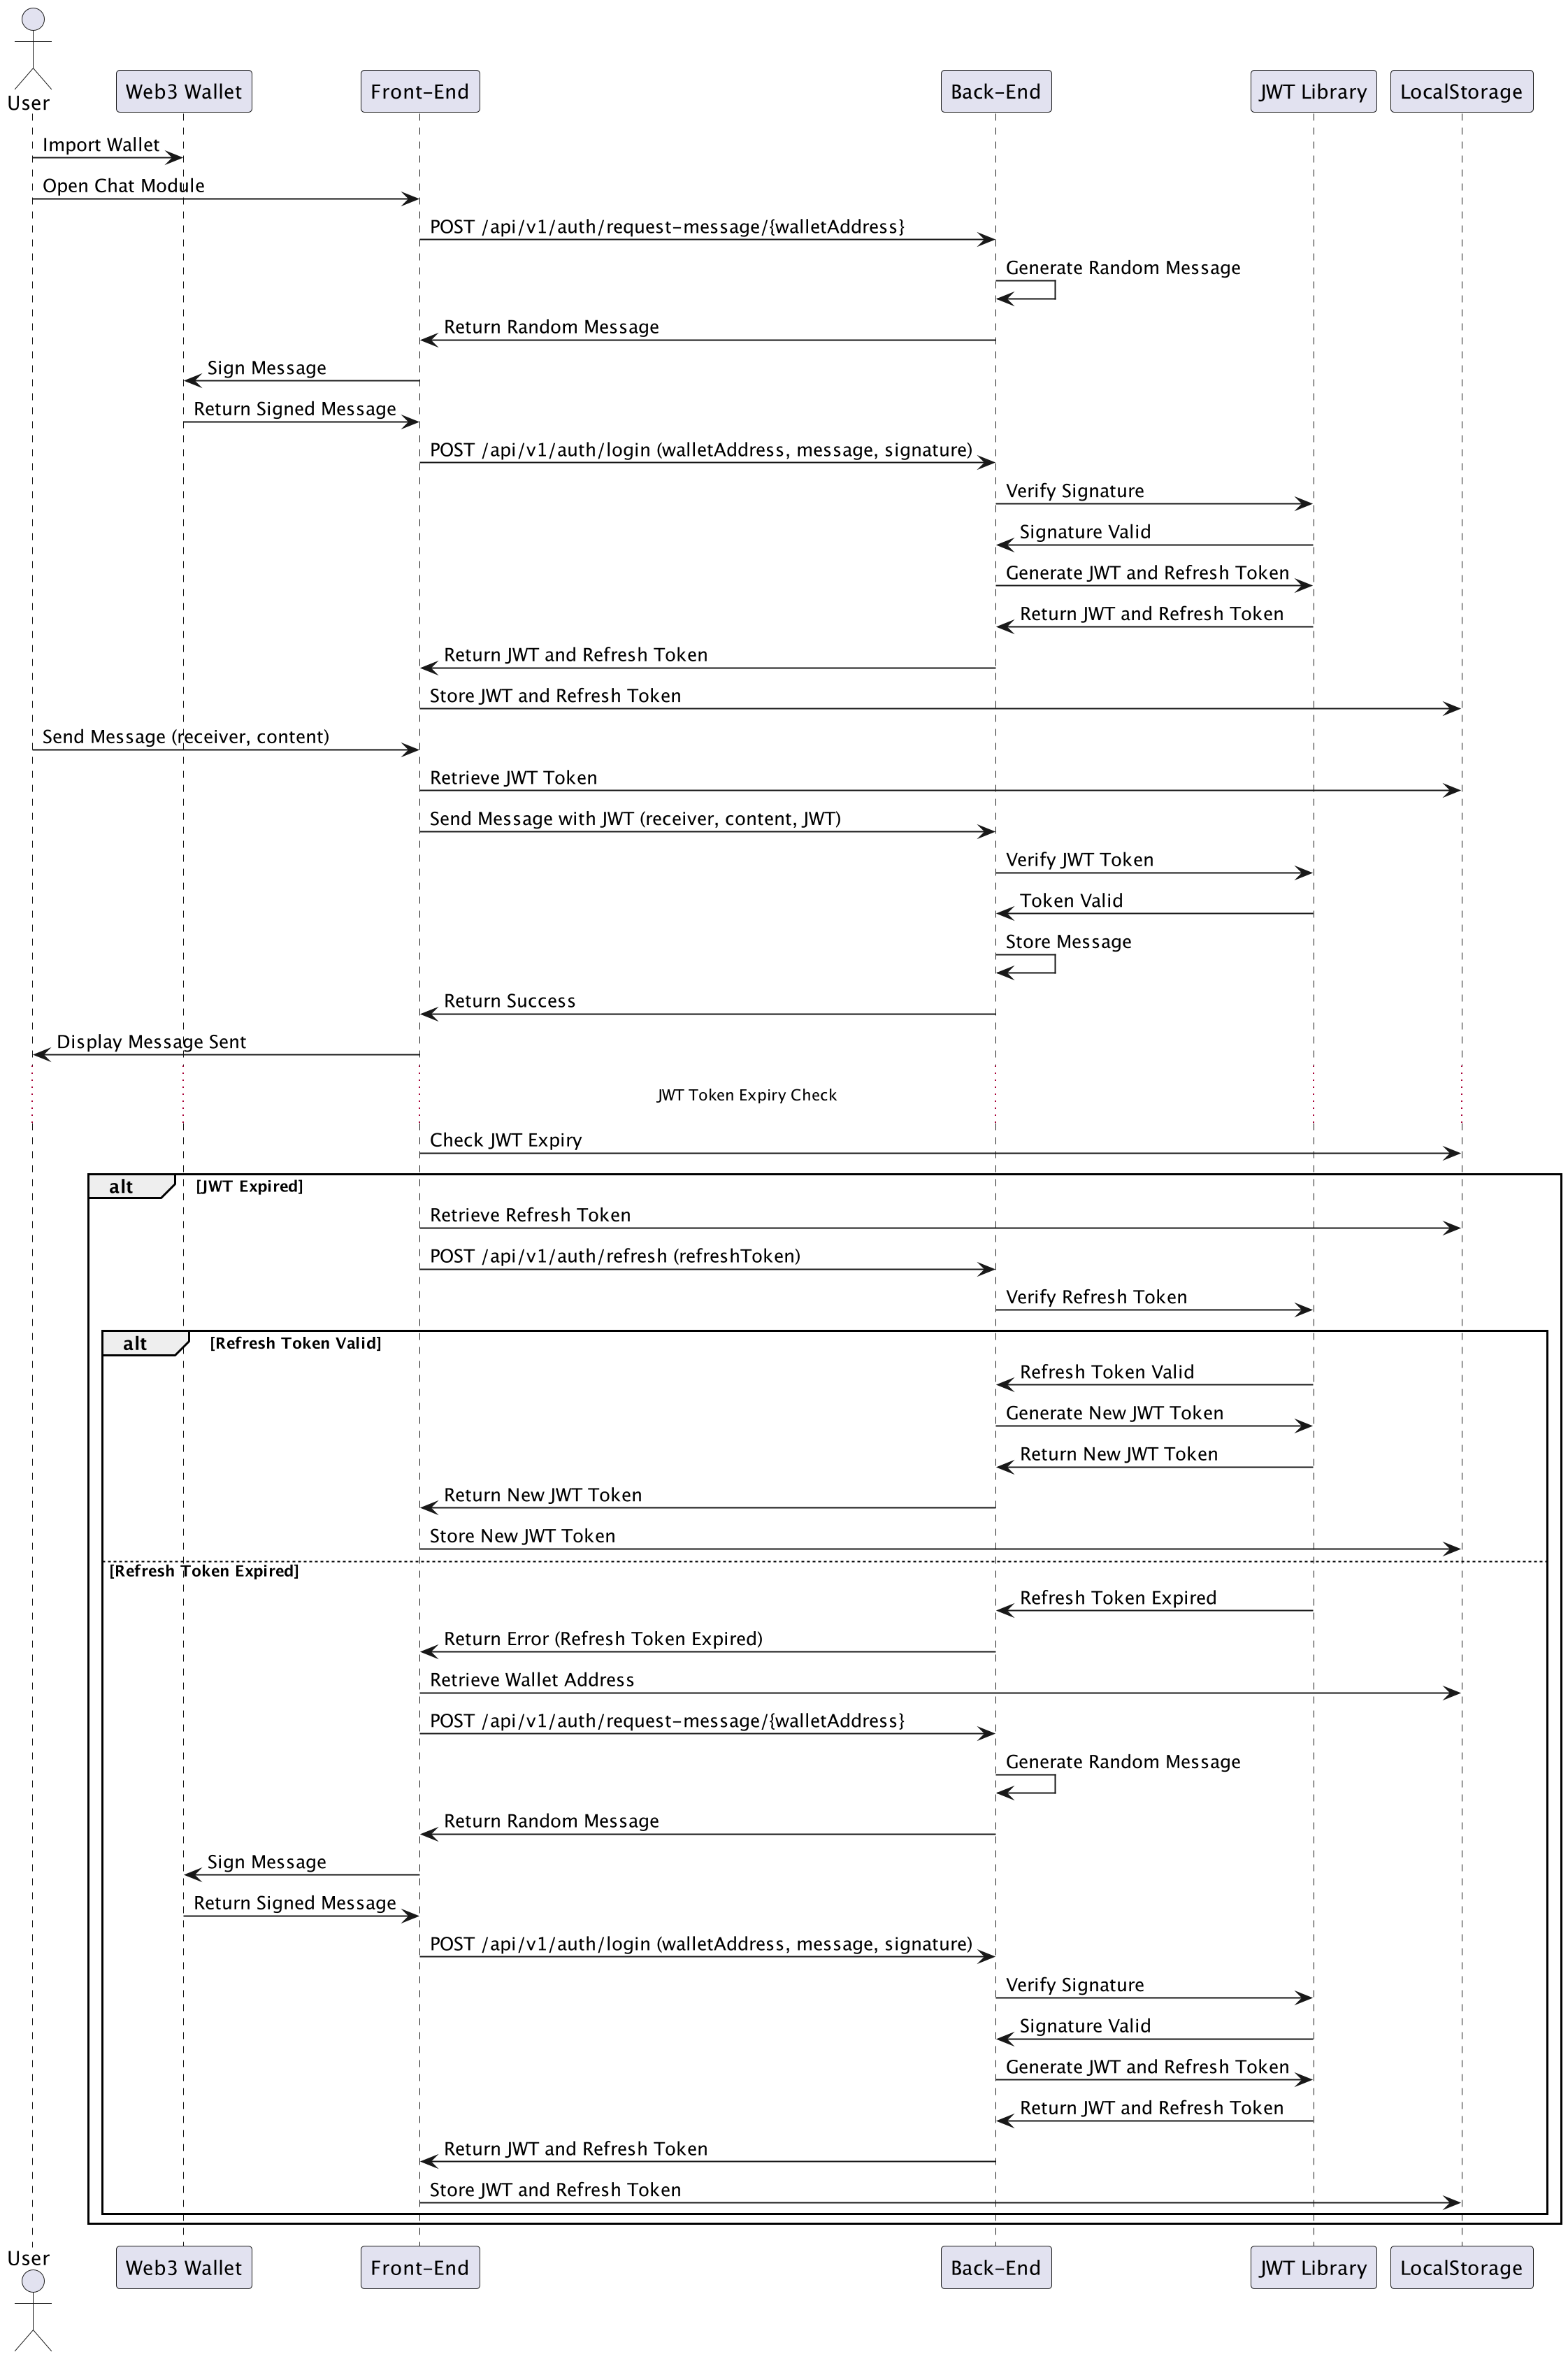
The Web3 Wallet Authentication and Secure Chat Flow is an innovative approach to handling authentication in a decentralized ecosystem. Unlike traditional authentication methods that rely on usernames, passwords, or two-factor authentication, this project leverages blockchain technology to authenticate users through their wallets, allowing seamless and secure access to Web3 applications such as chat systems.
By eliminating the need for passwords, this system enhances both security and user experience. Users authenticate by signing a message with their wallet, which the backend verifies. This flow generates JWT (JSON Web Tokens) for access and refresh, maintaining session integrity and token renewal through the refresh process.
Core Flow
The core authentication flow is based on signing and verifying messages using a user’s Web3 wallet. Here’s how the process works:
-
Request a Random Message:
- The frontend first requests a random message from the backend by calling the endpoint
/api/v1/auth/request-message/:walletAddress. - The backend generates and returns a random message associated with the wallet address.
- The frontend first requests a random message from the backend by calling the endpoint
-
Sign the Message:
- The frontend, using the Web3 wallet, signs the random message received from the backend. This signature is unique to the user’s wallet and serves as a proof of ownership of the wallet.
Message Signing Process
The backend handles the signing process using the MessageSigner class. This class signs the JSON data provided by the user using their private key. Here’s a breakdown of how the signing process works:
-
Generate a Query String: The data to be signed (e.g.,
messageandtimestamp) is converted into a query string, where keys and values are concatenated, sorted, and joined by an ampersand (&). -
Hashing the Message: The message is hashed using the Keccak-256 hashing algorithm (a variation of SHA-3, commonly used in Ethereum). A Kanban preamble is prepended to the message before hashing, which ensures that the message is formatted as a Kanban-signed message.
var preamble = "\x17Kanban Signed Message:\n" + messageBytes.length; var ethMessage = Buffer.concat([preambleBuffer, messageBuffer]); var hash = Hash.keccak256s(ethMessage); -
Sign with Private Key: The hash is then signed with the user’s private key using elliptic curve cryptography (secp256k1), commonly used in blockchain technologies. The private key, in this case, is converted from WIF (Wallet Import Format) to a hexadecimal format before signing.
var signature = Account.sign(hash, privateKeyHex); -
Return the Signature: The final output includes the
v,r, andsvalues of the signature (which represent different components of the signature in the elliptic curve algorithm), along with the full signature and message hash.
This ensures that the user can prove ownership of their wallet without revealing their private key, enhancing security and decentralization.
-
Login with Signature:
- After the frontend signs the random message using the user’s Web3 wallet, the signed message and the user’s wallet address are sent to the backend.
- The backend handles this login process by validating the signature. It does this by verifying if the signed message was indeed created using the private key of the specified wallet address.
Signature Validation Process
This validation process is handled by the MessageValidator class in the backend. Here’s a detailed breakdown of how it works:
- Extract Public Key:
The first step is to extract the public key from the signed message. The backend reconstructs the public key using ther,s, andvcomponents of the signature. This allows the backend to reconstruct the public key used to sign the message without needing the private key itself.
const pubKey = util.ecrecover(util.toBuffer(hash), v, r, s);-
The public key extraction relies on elliptic curve cryptography (ECC), which is commonly used in blockchain and cryptographic systems.
-
The signature components (
r,s,v) are extracted from the signature string, and the hash of the message is used in combination with the signature to recover the public key. -
Hashing the Message:
Before validating the signature, the message is hashed using the Keccak-256 algorithm, the same hashing algorithm used in Ethereum and other blockchain ecosystems. To ensure the message is compliant with Kanban standards, a preamble (\x17Kanban Signed Message:) is prepended to the message before hashing.
var preamble = "\x17Kanban Signed Message:\n" + messageBytes.length; var ethMessage = Buffer.concat([preambleBuffer, messageBuffer]); const hash = Hash.keccak256s(ethMessage);- Deriving the Address:
Once the public key is extracted from the signature, the backend derives the user’s wallet address from that public key. This step is crucial as it confirms that the message was indeed signed by the wallet owner.
- The backend uses the public key to generate the wallet address, which is compared against the address provided by the user during the login process.
- The Bitcoin Pay-to-Public-Key-Hash (p2pkh) method is used to generate the address from the public key. This approach ensures that the address derived from the signature is correct and corresponds to the wallet used in signing the message.
Here’s how the address derivation is performed:
const { address } = Btc.payments.p2pkh({
  pubkey: pubkey.publicKey,
  network: network,
});
The derived address is then compared against the one provided by the user during the authentication request. If they match, the validation is successful, confirming that the signature belongs to the wallet owner.
-
Generate JWTs:
Once the signature validation and address derivation are successfully completed, the system proceeds to generate JSON Web Tokens (JWTs) for session management. This involves creating two tokens:
-
Access Token:
The access token is a short-lived token, typically valid for 15 minutes, which is used to authenticate API requests. It contains essential user information, such as the wallet address, and is passed in theAuthorizationheader for all secured API calls. -
Refresh Token:
The refresh token has a longer lifespan, typically lasting for several days (e.g., 7 days). Its purpose is to allow the frontend to request a new access token without requiring the user to re-authenticate by signing a new message. The refresh token is stored securely, such as in the browser’s local storage.
Here’s the code snippet illustrating the generation of the access and refresh tokens:
const accessToken = jwt.sign(
  { walletAddress: user.walletAddress },
  process.env.ACCESS_TOKEN_SECRET,
  { expiresIn: "15m" }
);

const refreshToken = jwt.sign(
  { walletAddress: user.walletAddress },
  process.env.REFRESH_TOKEN_SECRET,
  { expiresIn: "7d" }
);
Both tokens are returned to the frontend, where the access token is used for subsequent authenticated API requests, and the refresh token is used to renew the access token once it expires.
-
-
Secure Chat Flow:
Once the JWTs are generated, the user can securely interact with the chat application. Here’s how the process works:
-
Authenticated Requests:
Each time the user interacts with the chat system (e.g., sending a message), the frontend includes the JWT in the request’sAuthorizationheader. This access token allows the backend to authenticate and authorize the user for the operation. -
JWT Verification:
The backend checks the validity of the access token by verifying its signature and ensuring that it hasn’t expired. If the token is valid, the request proceeds, and the message is sent; if not, an error is returned, and the user is prompted to refresh the token. -
Seamless User Experience:
If the access token is valid, the user’s chat message is sent successfully, providing a smooth experience. If the access token has expired, the system automatically triggers the token refresh process without interrupting the user’s session (detailed below).
This ensures secure, authenticated access to the chat system without the need for frequent re-authentication or password entry.
-
-
Token Refresh Process:
When the access token expires (usually after a short period, like 15 minutes), the frontend relies on the refresh token to get a new access token and continue making authenticated requests. This is how the refresh process works:
-
Access Token Expiration Detection:
The frontend keeps track of the access token’s expiration. Once it detects that the token has expired, it automatically sends the refresh token to the backend via a refresh endpoint (/api/v1/auth/refresh). -
Backend Validates Refresh Token:
The backend checks the refresh token to ensure it is still valid and unexpired. If the refresh token is valid, the backend generates a new access token and a new refresh token, ensuring continuous session management:
const newAccessToken = jwt.sign( { walletAddress: user.walletAddress }, process.env.ACCESS_TOKEN_SECRET, { expiresIn: "15m" } );-
Token Renewal: The new access token and refresh token are returned to the frontend, where the access token is used for the next authenticated request, and the refresh token is securely stored for future use.
-
Invalid Refresh Token: If the refresh token is invalid or expired, the backend returns an error, prompting the user to re-authenticate by signing a new message with their Web3 wallet.
This process ensures that users do not need to re-authenticate frequently while keeping the authentication system secure and efficient.
-
Technologies Used
-
Web3 Wallet Integration:
This system allows users to sign messages using their Web3 wallets, which are then verified by the backend. No traditional credentials, such as passwords, are required, providing a decentralized and secure authentication method. -
JWT (JSON Web Token):
JWTs are used for securing API requests after authentication. Access tokens are short-lived for enhanced security, while refresh tokens allow users to maintain longer sessions without frequent re-authentication. -
Node.js Backend:
The backend is built using Node.js, handling signature validation, JWT generation, and secure communication with the frontend. -
BitcoinJS:
BitcoinJS is used to derive wallet addresses from public keys, a key step in verifying the signature and confirming the user’s identity. -
EthereumJS:
EthereumJS is used for handling cryptographic functions such as recovering the public key from a signed message. This is essential for validating the user’s signature in a decentralized way. -
Kanban Framework:
This system uses the Kanban preamble for signing and verifying messages, which enhances the flexibility and security of the message signing process.
Value and Benefits
The Web3 Wallet Authentication System offers several key advantages:
-
Decentralized Authentication:
By using wallets to sign and verify messages, the system eliminates the need for passwords, reducing the risk of credential-based attacks, such as phishing or brute force attacks. -
Enhanced Security:
The use of cryptographic signing provides a strong guarantee that only the rightful wallet owner can authenticate, making the system highly secure. -
User-Friendly:
The system is streamlined for Web3 users, allowing them to use their wallets for authentication without needing to manage passwords or 2FA codes. -
Scalable and Extendable:
This authentication system can be integrated with various decentralized applications (dApps), including secure messaging platforms, financial services, or any system requiring decentralized identity verification.
Future Enhancements
Potential future developments for this authentication system include:
-
Multi-Wallet Support:
Adding support for more wallet types (e.g., MetaMask, Ledger, etc.) to expand the user base. -
Multi-Factor Authentication (MFA):
Combining wallet-based authentication with biometrics or other factors to provide additional layers of security. -
Performance Optimization:
Further optimizing the performance of signature validation and JWT generation, especially for large-scale decentralized applications. -
Support for Multiple Blockchains:
Expanding the system to support wallets from different blockchain networks, such as Ethereum, Binance Smart Chain, or Solana.
For more projects and updates, visit my GitHub profile.